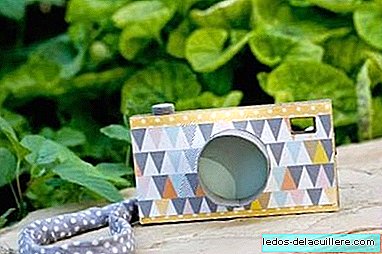
Seeing this camera made with little more than cardboard and scrapbook papers For crafts, I thought how beautiful! Especially for children who enjoy creating with their hands, and for children under seven years, because perhaps a larger camera may seem like a fake camera when we are accustomed to so much technology.
When you are little, it is still nice to look at the world through an objective that shows you the environment as it is (no zoom, no flash ...); and at the same time lets us catch a piece of that world imaginary. In addition, this camera would look great in a costume, or as a gift to the guests of a birthday (as long as they are not more than 10 because we are doing a few days doing them).
María has a blog called "The study fish", from which there is no lack of ideas of details made in paper and fabric that will turn small moments into great facts and simple gestures into tests of affection. But he also sells beautiful crowns for the princes of the house, and some pictures on paper that seem to come alive.

On this occasion, I bring you this idea for that carefully designed cardboard camera:
Materials:
Simple cardboard for crafts, scrapbook papers, scissors, double-sided adhesive tape, glue stick, cutter, cutter for cutting circles.
How it is done:

First we draw the templates on a simple blank sheet. The largest are the base of the camera, they will be rectangular (approximately 10 x 5 centimeters) and we will mark a landscape x to know the center, as well as a small rectangle at the top end (the viewfinder).
Then we pass the template to four cards (the minimum to create several layers that give body), and one of them we cover with a beautiful paper, ensuring that the center mark remains visible on one of the faces. Maria tells us that there is a cutter to cut circles (I had no idea, but I point it out), with which we will cut what will be our goal.

Using a rectangular card long enough (and about three centimeters wide), we will finish our goal, which we will place around the circle in the decorated cardboard, cutting small tabs on one of the landscape edges, which will allow the rectangle to have flexibility.
At this time we can adhere the different layers that will give body to the camera, matching the viewfinders. We will use double-sided tape (or white glue). But attention !, before, and covering behind the circle of the decorated paper, we glue a rectangle of light color, or better still of acetate paper, to simulate the crystal.
The trigger is quite easy to achieve with a drilling machine or a die cutter. And the process is the same: cut several layers of circles that glued to each other form the button that will then be glued to the surface.

The tape is obtained with a cotton cord covered in fabric and tied to a strip of cardboard like the one you see in the image, which previously will have been glued and left to dry on the back of the camera body.
And now look at the target, smile and enjoy…